Teacher Resources
Whether you're just getting started or returning for another season, our library of resources will help you grow native species with your students.
Growing Methods for Native Species
Most Midwestern native seeds need a period of cold, moist conditions (called stratification) before they'll germinate. There are two methods we recommend:
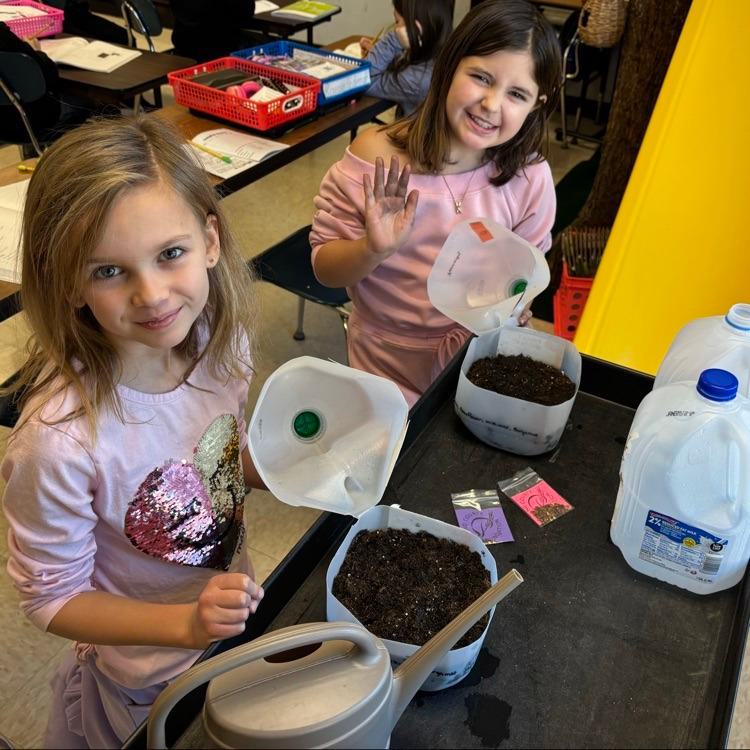
Winter Sowing (Recommended: easiest, lowest cost). Seeds are sown directly into repurposed plastic jugs, which act as mini greenhouses outdoors through the winter and spring. No special equipment needed. A great option for all ages.
Greenhouse or Grow Lights. Seeds are cold-stratified in the refrigerator with moist sand, then sown into germination trays and grown indoors under lights or in a heated greenhouse. Better for older students.

Direct Seeding (Not recommended). Sowing seeds straight into the ground has a very low success rate and isn't something we advise for school projects.
Method 1: Winter Sowing
Winter sowing mimics a native seed's natural growing process, no greenhouse, grow lights, or heat mats required. Seeds go into semi-transparent plastic jugs filled with soil, which sit outside all winter to stratify, and germinate on their own as the weather warms in spring.
What you'll need:
- Translucent, gallon-size plastic jugs (ideally one per student or per small group)
- Potting soil (a high-quality "germination mix" works best; about 1 cubic foot fills roughly 10 jugs)
- A wax pencil or grease pencil for labeling (won't fade or weather away like a marker)
- Optional: cardboard for site prep, plastic cups or milk cartons for a giveaway, milk crates to keep jugs from blowing away

Click here to view or print the simple winter sowing guide.
Winter Sowing Tips:
- If working with younger students, consider prepping the jugs yourself ahead of time, cutting plastic with scissors/box cutters can be slow and risky.
- Always start with pre-moistened soil. Have students add water to soil in a large bin (a tarp underneath helps contain the mess) and mix together before filling their jugs.
- Students love having ownership over their own jug. If you don't have enough jugs for every student, group students by species instead.
- Grease pencils hold up much better than permanent markers for labeling jugs.
- Seeds are precious: tap a small amount into your palm and have students pinch it out, usually 1-2 pinches per jug is enough. The cues "sprinkle fingers" (for spreading seed) and "tuck them into bed" (for gently pressing it in) work well with students.
- The #1 cause of failed germination is too much soil on top of the seeds. Cover seeds with only their own width of soil; smaller, dust-like seeds need just a light dusting.
- Immediately after planting, place jugs somewhere outdoors protected from wind and vandalism, and let administration and grounds staff know they're a school project so they aren't mistaken for litter and tossed. Milk crates help keep jugs from blowing away.
- If planting outside: collect cardboard through the winter and lay it down in spring to smother weeds, weighing it down with rocks, bricks, or mulch (some cities deliver wood chips for free). Plant directly through the cardboard and mulch at 1 ft spacing using a cordless drill with an auger bit, in groups of 3-5 so pollinators can "see" them.
Additional Winter Sowing Resources
WINTER SOWING TIMELINE
Click here to view or print this timeline for winter sowing.


ONE PAGE HOW-TO GUIDE
Click here to view or print a simple, step-by-step winter sowing guide.
LETTER TO TEACHERS WITH HELPFUL WINTER SOWING HINTS
Click here to view or print an introduction to the program and helpful winter sowing hints.
Method 2: Greenhouse Growing / Grow Lights Indoors
This method starts seeds indoors, giving them a head start on weeds and a higher survival rate than direct seeding. It works with either a heated greenhouse or standard indoor grow lights.
What you'll need:
- Step 1 (December/January): Sterilized play sand or silica, plastic baggies, permanent markers
Step 2 (January-February): Refrigerator or unheated garage
Step 3 (Early March): High quality potting soil mix (about one large 2cu ft bag), germination trays (no holes), tape, permanent markers (for labeling trays), warm greenhouse/grow lights, gentle watering system
Step 4 (April): Additional soil (dependent on how many seedling you upshift), individual plastic pots, and bottom trays (with holes), tape & markers for labeling pots

Click here to view or print our greenhouse growing guide.
Greenhouse / Grow Lights Tips:
- Seed packets vary in how much area they'll cover. Rule of thumb: a baggie about 1/4 full of sand with a few pinches of seed covers roughly a standard 10x20" greenhouse tray.
- Portion seeds into your own palm and have students pinch them out into their bags of pre-moistened sand, rather than pouring straight from the packet.
- Split students into small groups of 3-5 per bag, with just one species per bag. Keep everything clearly labeled, with species name and dates.
- While seeds are germinating, keep them consistently moist, drying out even over one sunny weekend can be fatal. Consider keeping trays in the classroom (where you'll notice if they dry out) before moving them to the greenhouse, and make a plan ahead of school breaks.
- The #1 cause of failed germination is too much soil on top of the seeds. Cover seeds with only their own width of soil; smaller, dust-like seeds need just a light dusting. Always start with pre-moistened soil.
- If planting outside: collect cardboard through the winter and lay it down in spring to smother weeds, weighing it down with rocks, bricks, or mulch (some cities deliver wood chips for free). Plant directly through the cardboard and mulch at 1 ft spacing using a cordless drill with an auger bit, in groups of 3-5 so pollinators can "see" them.
Additional Greenhouse Growing Resources
GREENHOUSE GROWING TIMELINE
Click here to view or print this timeline for growing native wildflowers in your greenhouse.


ONE PAGE HOW-TO GUIDE
Click here to view or print a simple, step-by-step greenhouse growing guide.
LETTER TO TEACHERS WITH HELPFUL HINTS
Click here to view or print an introduction to the program and helpful greenhouse growing hints.
Additional Resources
Click here to view or print wildflower postcards.

Pollinator Relay Game


Pollinator Habitat Curriculum Guide
Together with the Earth Partnership at the University of Wisconsin, we developed a Pollinator Habitat Curriculum Guide that is available via free download. The guide provides high school educators with a set of activities appropriate for establishing, managing, and monitoring prairie habitat suitable for monarch butterflies, other insect pollinators and grassland birds. The guide aligns with Common Core and Next Generation Science standards. Click here for more information.
